How to Change Colors in Knitting
First of all, you need to have a knitting project! Find a knitting pattern of your choice and gather the yarn you need. Changing colors in knitting is pretty much the same regardless of the project you are working on, but the more colors you use, the more complicated it will be to manage. Experimenting with different yarn colors can significantly enhance the visual appeal of your projects, making them vibrant and eye-catching. There are several methods for changing colors in knitting. Below, I will share how I usually do it. Hopefully it will be helpful!
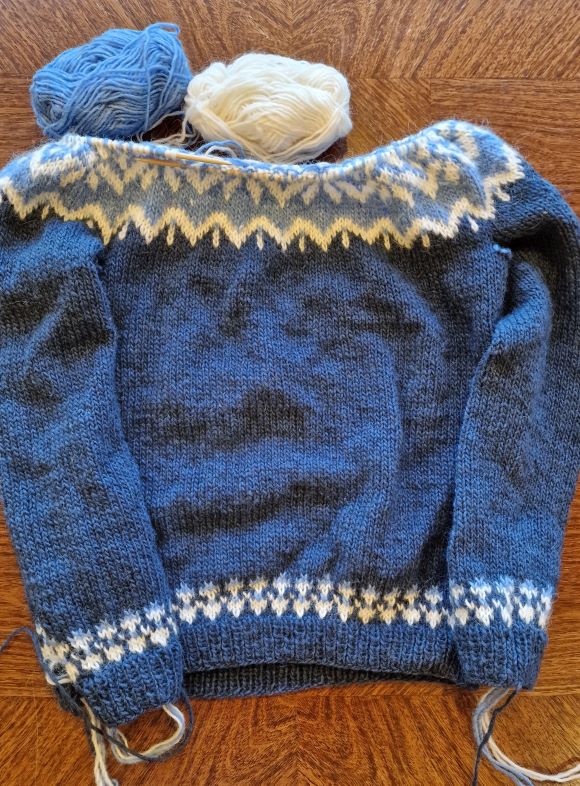
At the moment, I am knitting a sweater for my ten-year-old boy. It features three different yarn colors at the bottom and on the chest, while the arms and stomach are in a main color. It is an Icelandic sweater, and I am using Icelandic yarn, one of my favorite types. It’s so durable and clean. I usually wash sweaters made with Icelandic yarn only once a year—unless it’s a children’s sweater, which probably needs more frequent washing. That alone makes me like Icelandic yarn even more.

Take some time beforehand to choose the right yarn and project that will be useful for yourself or someone in your family. I have knitted projects that ended up unused (due to the kids not wanting them), which felt like a bit of a waste of time. Of course, it’s good practice, but seeing my loved ones wear my creations is very rewarding. Therefore, I recommend choosing wisely before you begin. If you are new to knitting, start with simple projects that are not too complicated.
How to Change Colors
When you knit with one color and change to another from a new ball of yarn, it helps to have the new color ready beforehand. First, finish knitting with the initial color, then take the new yarn and let a small tail of it hang down where you’ll start knitting with the new color. The next stitch will be worked directly with the new yarn. Simply continue knitting, using your right needle to pick up the new yarn from your left hand. The stitches might look a little loose at the color change, and there might be a small hole where the colors meet, but don’t worry—you’ll fix this when you finish your project. If you’re working in the round (using circular knitting) , the next row will also help tighten things up. A useful tip is to regularly check your work, either periodically during your knitting or at the end of each row, to ensure it looks and feels right in your hands. It shouldn’t be too tight or too loose—it’s all about balance. Over time, you’ll develop your own touch, which is perfectly fine!

If you’re working on a larger project with more than two colors, such as switching between three different colors, the process is the same. Knit with one color, switch straight to the next, and let the thread hang slightly loose where you make the change. When you alternate between colors already on your needles, let the threads hang loose behind the knitting. Be careful not to pull too tightly, as this can distort the project and pull the work together. To ensure the threads lie nicely behind the knitting, gently pull the work so the threads can stretch a little. This way, your finished garment will fit comfortably and won’t be restricted by short threads.

When working with multiple yarn balls, it’s important to stay a little bit organized. Keep track of the colors you’re using and their order. I like to maintain a system, such as alternating forward and backward through the colors, to prevent tangling—provided it aligns with the instructions and stitch patterns. I personally love working with two to three different colors of yarn, as it adds variety without feeling too overwhelming. But believe me, it’s not always easy to keep all the threads in order. Sometimes I have to stop and straighten out all the threads that have gotten tangled up. Try to be patient, this happens even to the experienced knitter!

Color changes can occur at the beginning of a row, middle, or end of a row, or even in a new row. Random color changes with your working yarn can be challenging but will make your project exciting and unique! If you still feel a bit confused, watching video tutorials, or using step-by-step guide will hopefully be helpful.
Smooth Transition
When you change colors, the stitches may initially look a little loose, even for experienced knitters. However, once you’ve finished your project and woven in all the loose ends, it will look much cleaner. Keep this in mind as you work—it’s the finished project that showcases the final look.

To complete your project, it is a good idea to sew the loose ends (a small bit of yarn) on the backside in a direction that ensures the holes close properly without being too tight. If it looks good, it probably is good. Make sure you do not forget any yarn tails on the backside of your working project.

A simple needle tips is to use the yarn ends in your working project to sew together the remaining holes from the color changes. The goal is to achieve a seamless transition between colors. With careful attention to detail, your project will look polished and professional.

Finally, make sure you have fun while working on your project. One thing I love is listening to podcasts or sermons while I knit. I also enjoy meeting with other mothers to chat while we knit together. It’s an amazing opportunity to relax, have fun, and create beautiful, useful projects with my hands.