How to Add a Stitch in Knitting
In this blog post, I will share how to add a stitch in knitting, along with some photos of my knitting project, and show how the knitting stitches look when you add them to your work. If you are a beginner knitter, you can read through this post for inspiration. Otherwise, grab your knitting needles and enjoy a happy knitting experience!
What You Will Need to Start a Knitting Project

Knitting Needles
- Types: There are three main types of knitting needles:
- Straight needles: Ideal for flat knitting (scarves, blankets).
- Circular needles: Used for knitting in the round or for larger flat pieces.
- Double-pointed needles (DPNs): Commonly used for small, round items like socks or sleeves.
- Materials: Needles are available in metal, wood, bamboo, or plastic. Metal needles are smooth and fast, while wood or bamboo offer more grip.
- Size: Choose needle size based on the yarn weight you’re using. The thicker the yarn, the larger the needle size.
High-Quality Yarn
- Weight: Yarn comes in different weights, ranging from very fine lace weight to bulky yarn. Beginners often start with worsted weight yarn because it’s easy to work with.
- Fiber: Yarns are made from various materials like wool, cotton, acrylic, or blends. For beginners, acrylic or wool blends are recommended as they are affordable and easy to manage.
- Color: Choose a light color so you can easily see your stitches as you learn.

Scissors
A small pair of scissors is essential to cut the yarn when you finish a project or need to trim ends.
Measuring Tape or Ruler
You’ll need a measuring tape to check the dimensions of your project, especially for garments or items that require precise sizing.
Stitch Markers
These are useful for marking certain points in your knitting, such as the beginning of a round or a specific pattern repeat. You can buy special rings or use a small piece of contrasting yarn.
Knitting Pattern
Find a knitting pattern on websites like Drops Design, which offers free pattern instructions and video tutorials for beginners. I also recommend checking out Lopi Design for Icelandic knitting patterns, which are some of my favorites.
How to Add New Stitches for a Bar Increase
I usually add stitches when knitting the arms of a sweater, as they get wider the longer you knit. I also add stitches at the waist when knitting a sweater for myself. Sometimes, I need to decrease stitches, as I did for a summer project where I knitted a beautiful dress for my daughter from an Icelandic pattern I had at home. Icelandic patterns, by the way, have very beautiful chest designs that I love.
There are different ways of adding a stitch on a knitting needle in knitting, and one of my favorite methods is to use the right-hand needle and insert it into the small hole between the stitches on your needles. I explain this in more detail below. If this is your first time adding a stitch, don’t worry—it’s very easy, and there is no correct way of doing it! It might feel tricky at first, but once you practice a few times, it will become natural.

One method to add extra stitches with your working yarn, is to twist the yarn (ribbon) onto the needle on the right side, and this automatically creates a new stitch. The other method, as I described earlier, involves catching the yarn between the stitches with your right-hand needle, twisting it onto your left needle, and then knitting it. You can twist the yarn either to the right or left. I typically twist one to the left at the beginning of a row and one to the right at the end of the row (if I remember correctly). These two twists look slightly different, and you can choose the one that suits your project best. But it does not really matter if you start twisting it to the right or to the left; you can also twist all of them the same way.
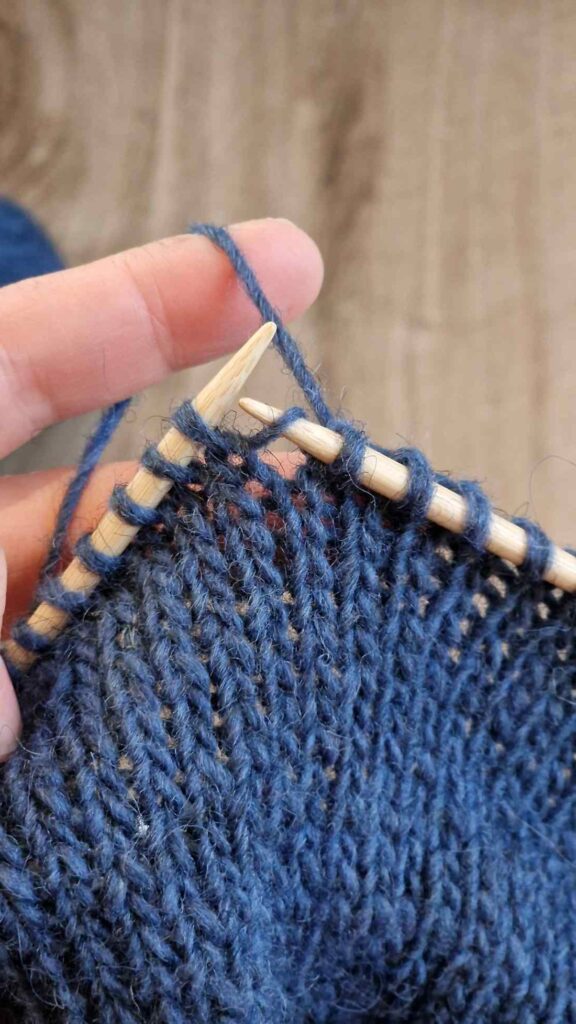


For example, when knitting sleeves, I always add a stitch at the beginning of a row—right after the first stitch—and before the last stitch in the same row. Here’s how to do it: Catch the yarn between the stitches with the tip of the right needle, twist it with the left-hand needle (or with both needles), and place it on the left needle. Then, knit the new stitch. Make sure to choose the method that works best for you and gives you the result you’re looking for! After adding a stitch, be mindful when knitting the next row. Pay extra attention to the stitches above the new ones to ensure your work looks even and smooth. As the number of stitches increases, it’s important to keep track of the stitch count according to your pattern instructions.

Final Thoughts
My final advice is this: as you work on your knitting project, whether adding stitches or trying something new, always choose the method that makes the piece look great in your eyes (this is especially important on the front of the work)! What I mean is, follow the pattern, but don’t be afraid to adjust or break a few rules if something doesn’t look right. That’s what I do—I stick to the pattern, but if I notice a mistake, like a hole, I figure out my own way to fix it. So, trust your instincts and don’t stress too much about following the instructions exactly. You’re the boss! If it looks great, it is great—no matter how you got there!
I sincerely hope you enjoy the process and have the best knitting experience! Let me know in the comments below if you liked this post!